Bitmapped (Raster) Images
You may have downloaded an image similar to this:
1. Launch Photoshop and open the file. You can also click and drag the file from your desktop to the Photoshop icon in the Dock and release the mouse button once the Photoshop icon is highlighted.
2. Go to Image Menu>Mode>Grayscale. Click OK when asked to discard color information.
3. If the image looks flat (lacks contrast) and needs adjusting, try Image>Adjustments>Brightness and Contrast. This image needed the contrast adjusted (more contrast).
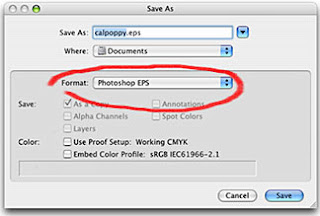
4. SAVE the new EPS or TIFF file. "Save As" to the Documents folder. Format should be either EPS or TIFF.
Note that the file extension will automatically change to ".eps" or ".tif" Don't change the file extension yourself -- let Photoshop do it.

Be sure to give the new file a new name so as to not replace the original (so you will have both a color and grayscale version of your file).
Illustrator (vector) images
If you have an "eps" vector image such as this:
1. Launch Illustrator and open the file.
2. Select the object (in this case Select All).
3. Go to Edit menu>Edit Colors>Convert to Grayscale.
4. "Save as" with ".eps" or ".ai" format and new name to not replace the original (so you will have both a color and grayscale version of your file):


No comments:
Post a Comment